Sunday 28 July 2013

Brake pedal

Well I finally got a bit on the car which surprisingly was the brake pedal and associated gubbins. I was a little put off when opening the master cylinder to find the notice below:
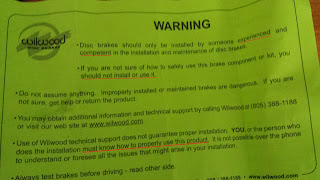
I can't see how anything can go wrong.
Now, consider that until I saw a picture of it a few minutes ago, I had no idea what a master cylinder looked like, so I'm certainly not 'experienced' or 'competent' and I have no idea 'how to properly use this product'. Still, I'm not letting that put me off as brakes are for wussies anyway :)

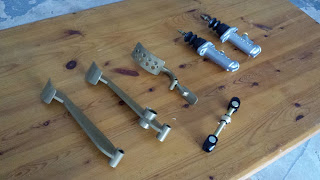
I even put the pedals in the correct order.
So today's mission is made up of these six bits, three pedals, two master cylinders and a joiny thing. The joiny thing needs to be taken apart though and hammered through the brake pedal, this made me smile as my first job on the car utilises a hammer, who'd have thought.
Of course it wasn't as easy as that as before I could get hammering I had to remove a fiddly c-clip which 1) is very tight 2) likely to break 3) impossible to put back on afterwards. So Tim came up a bodge where we basically just hammered it anyway. It worked, and we were happy as it involved a successful bodge. So the brake pedal now has the master cylinder's attached.

Next it's just the case of fitting it to the car, the first bit to go on! Of course, another hurdle in that the bolts to attach the master cylinders to the frame were not in the kit, I have no idea if they should have been in the kit, so I've just put some temporary bolts in for now to get it all adjusted correctly
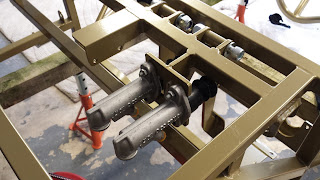
It's upside down, but the brake pedal is now in place.


Thursday 25 July 2013

Unboxing

Although it didn't actually come in a box, I decided that I'd start by getting organised and unbox everything and see what I had. It turns out I have quite a lot of things. I started labeling stuff and getting organised but it soon turned out that I have no idea what most of the bits are. That's ok though, I have some instructions which I haven't looked at yet, that'll sort me out hopefully! Otherwise there might be quite a lot of 'guess where this goes' competitions on this blog.
Pretty sure these are something to do with the brake system.
I'm a little worried however that there are only three of them!

With everything now in order I turned to the first job in hand, fitting the floor.

The floor is a sheet of aluminium (that's al-u-min-i-um, not aloo-me-num, don't make me hit you) that needs to be cut out to fit and pop riveted to the frame, easy right? Except that I have no clue what to cut it with or a pop rivet gun thing. Fast forward a little and after talking to Mick at work, I now have a plan, and some tools.

Hopefully this will be the last time it's this way up.
Unwrapping was a little like xmas, except without a massive meal. Man, I should have done some of those pigs in blankets, that would have ruled.

Once unwrapped I tipped it on the side, popped the floor down and put it back the right way up. Pretty sure I haven't done anything wrong yet, best take some photos before it's on fire and my bicycle welded to the roll cage.
Still more work to do before it's finished.

Now that the floor is layed in place, I took the opportunity to try it out, don't get me wrong, the car is still missing a few bits such as wheels, brakes, an engine and well, everything, but I had to try it out.

Next up: Cutting the floor out (dreading that bit), and riveting it in place.


Thanks for labeling it, but I'd figured it out.

The floor in place.


And so it begins...

I've been told that the bubble wrap will hinder my aerodynamics.
Well, the day has finally come, my 'kit in a box' has arrived. Technically though, it wasn't actually in a box but I won't hold that against anyone. For those that don't know what I'm rambling on about, I'm going to attempt to build a Mevabusa kit car.

So the giant jigsaw puzzle begins, I have to stress that I know nothing about the mechanical workings of a car and have never done anything other than check the tyre pressures on a car before. So it's a bit like the blind leading the blind, except that might actually be entertaining to watch, think of the scene from See No Evil, Hear No Evil where Gene Wilder is having to stomp his feet so that Richard Pryor can hear where he is... man I could watch that all day.

I think the quoted time is 250 hours, but in reality I have 1 year to do it (start the clock Anneka) to enable that I get a free IVA test from Road Track Race. Expect lots of close ups of things along with questions like "what is this?Where does it go? And, is it important?". 
It said 'kit in a box', more like 'kit in lots and lots of boxes'.

I'm asked a fair bit about what I'm going to do with it when it's built, well the current plan is to drive it to track days and have a bit of fun. It's not really a replacement car as it's not that practical, what with no doors, roof, engine cover or boot, but who needs those things, right?

Although I have the kit, one bit I am missing is the engine. This comes from a donor bike, a Suzuki Hayabusa to be exact. The powerful, lightweight engine 1300cc kicks out around 170bhp which doesn't sound a lot but the car itself only weighs 4-500kg, so it has a very nice power to weight ratio. This is the ethos I'll be building to, nothing that doesn't have to go on the car will, in fact some of the things that should go on probably won't either as I have no idea where they'll go!

So the next stage is to start the basics, and begin the hunt for a Hayabusa to buy and break. I could have done this already but funds haven't allowed it so far, so it might be Flintstone power for a while yet.